My niece Lucy asked why we couldn’t just use olives for the eyes. I started to explain why that wouldn’t work—olives are too big, too slippery, kids would pick them off. Then I stopped. Honestly, I had no good reason. I’d just always used pepperoni rounds for eyes because that’s what the magazine picture showed me ten years ago.
So we tried it. Lucy carefully placed two black olive slices on her mini pizza face, and I’ll be honest—I was ready to watch her pick them off. But she didn’t. She ate the whole thing, olives and all, and said it looked “more like a real monster.” She was right. The dark circles against the pale mozzarella gave it this slightly goofy, slightly spooky look that pepperoni rounds never quite captured.
That moment changed how I make these Cozy Mini Halloween Pizza Faces forever. Now I let the kids decide the faces, and honestly, they come up with better combinations than I ever did. One uses bell pepper strips for scars. Another does mushroom slice eyeballs. My youngest, who usually avoids anything green, made a face with basil leaf hair and ate every bite.
Maybe you’ve been there—stuck in a rut with a recipe you’ve made the same way for years, certain your way is the right way. I was that person with Halloween pizzas. But here’s the thing about cooking with kids: sometimes their “wrong” ideas are better than our “right” ones. These mini pizzas are cozy, customizable, and perfect for a slow October evening when the air turns crisp and everyone just wants something warm and silly.
Why You’ll Love This Recipe
These Cozy Mini Halloween Pizza Faces are the kind of recipe that makes you feel like a kitchen hero with almost zero effort. I’ve tested them with my own kids, my niece Lucy, and a handful of skeptical neighbor children who “don’t like pizza” (I know, I didn’t believe it either). Every single one cleaned their plate.
- Quick & Easy: From fridge to table in under 20 minutes. Perfect for Halloween night when you’re juggling costumes and candy.
- Simple Ingredients: Just pizza dough, sauce, cheese, and whatever veggies you have. No specialty stores required.
- Perfect for Halloween Fun: Great for parties, playdates, or a cozy night before trick-or-treating.
- Crowd-Pleaser: Kids love building their own faces, and adults love how easy cleanup is.
- Unbelievably Delicious: The crispy edges, melty cheese, and fun toppings make comfort food magic.
What makes these different from every other Halloween pizza recipe? It’s the freedom. Most recipes tell you exactly how to make a specific face. This one gives you the tools and lets the kids create. I’ve seen a pizza face with mushroom ears, a pepperoni smile, and olive eyes that looked genuinely surprised. That creativity makes them eat better, too.
This is the recipe you pull out when you want a cozy, low-stress activity that ends with full bellies and happy faces. It’s comfort food with a side of giggles.
What Ingredients You Will Need
This recipe uses simple, mostly pantry-friendly ingredients to create something that feels special without a trip to five different stores. Most of these you probably already have, especially if you keep pizza night supplies on hand.
- Pizza dough, 1 pound (store-bought or homemade, room temperature works best)
- Pizza sauce, ½ cup (I prefer Rao’s or a simple homemade version)
- Shredded mozzarella cheese, 1 ½ cups (low-moisture, part-skim melts best)
- Pepperoni slices, ¼ cup (for mouths, noses, or funny eyebrows)
- Black olives, ¼ cup sliced (for eyes—trust Lucy on this one)
- Bell peppers, any color, ¼ cup diced (for scars, hair, or monster teeth)
- Mushrooms, ¼ cup sliced (for ears or warts—kids love warts)
- Fresh basil leaves, small handful (for hair or silly mustaches)
- Cherry tomatoes, ¼ cup halved (for rosy cheeks or angry eyebrows)
- Olive oil, 1 tablespoon (for brushing the crust)
- Garlic powder, ½ teaspoon (optional, for extra flavor)
- Italian seasoning, ½ teaspoon (optional, for sprinkling)
I recommend using a good-quality pizza dough from the refrigerated section of your grocery store—the kind that comes in a bag, not a can. My favorite is the one from Trader Joe’s, but any brand works. If you’re feeling ambitious, homemade dough is lovely, but honestly, the store-bought version saves time and stress.
For the cheese, low-moisture mozzarella is key. Fresh mozzarella releases too much water and makes the pizzas soggy. You want that stretchy, gooey melt that holds the toppings in place.
If you have picky eaters, feel free to swap the veggies. I’ve used shredded carrots for orange hair, corn kernels for teeth, and even sliced grapes for eyes (my nephew insisted, and it was surprisingly good). The beauty of this recipe is the flexibility.
Equipment Needed
You don’t need fancy equipment for these Cozy Mini Halloween Pizza Faces, which is part of what makes them so approachable. Here’s what you’ll need:
- Baking sheet, 1 large (rimmed works best to catch any drips)
- Parchment paper, for easy cleanup (I’ve forgotten this before—trust me, use it)
- Rolling pin, or a wine bottle in a pinch (I’ve used both)
- Round cookie cutter, 3-4 inches wide, or a drinking glass with a thin rim
- Small bowl, for the pizza sauce
- Pastry brush, for olive oil on the crust (a paper towel works too)
- Cutting board, for prepping toppings
- Chef’s knife, for slicing veggies
- Measuring cups and spoons
If you don’t have a round cookie cutter, a clean tuna can works perfectly. I learned that from my grandmother, who never owned a cookie cutter in her life. Just make sure the edges aren’t sharp. A drinking glass with a thin rim works too, though it might squish the dough a bit more.
For the baking sheet, any size works as long as the pizzas fit without touching. I use a standard half-sheet pan and can fit about 8 mini pizzas at once. If you’re making a big batch, you’ll need to work in batches or use two sheets.
Preparation Method
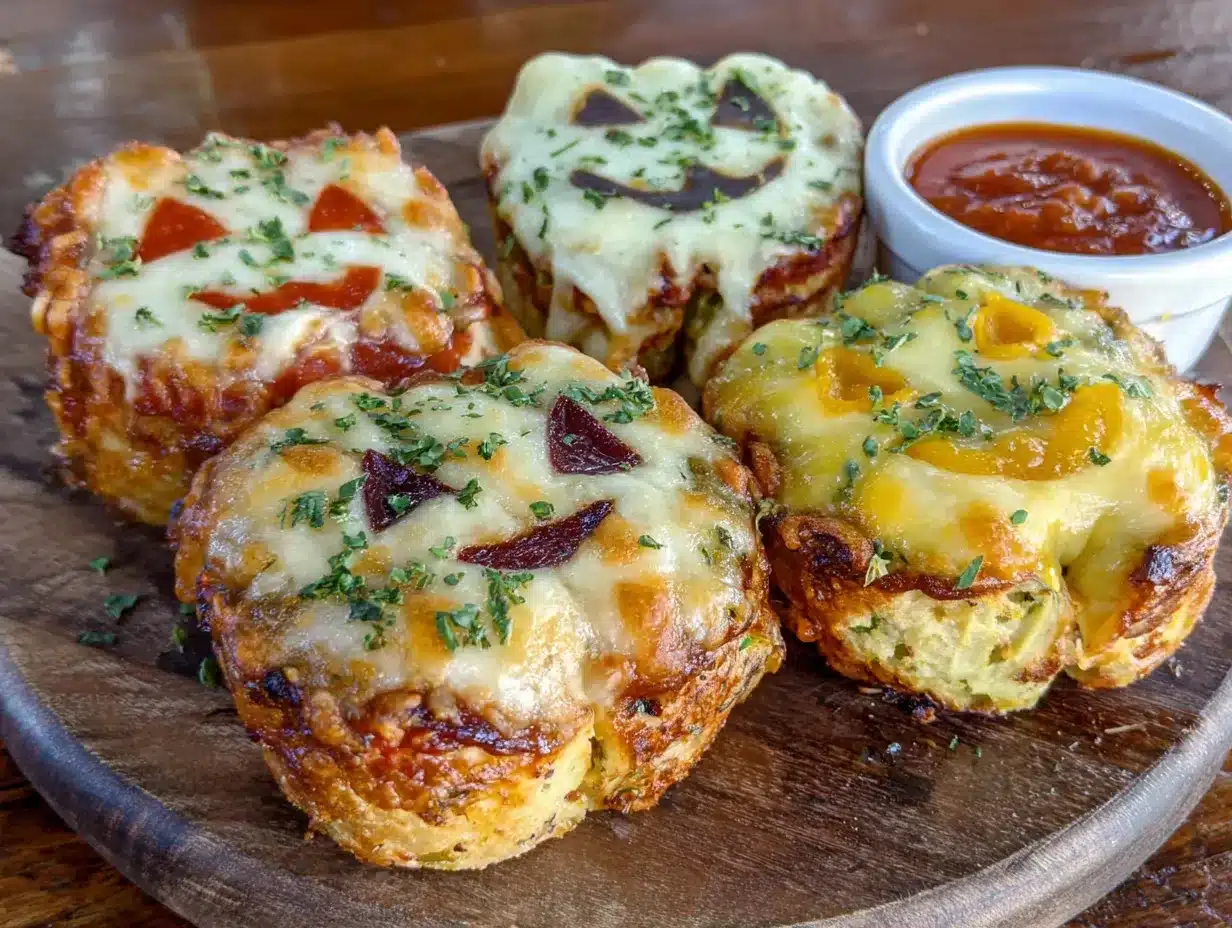
Let’s make these Cozy Mini Halloween Pizza Faces. I’ll walk you through every step so you feel confident, even if this is your first time making mini pizzas.
- Preheat your oven to 425°F (220°C). Place a rack in the middle position. While it’s heating, line your baking sheet with parchment paper. This step saves so much cleanup time—learn from my mistakes.
- Prepare your pizza dough. If using store-bought dough, let it sit at room temperature for about 20 minutes. Cold dough is hard to roll and springs back. Lightly flour your work surface and rolling pin. Roll the dough out to about ¼-inch thickness. Don’t stress about making it perfectly round—you’re cutting circles anyway.
- Cut the dough into circles. Using your round cutter or glass, press down firmly and twist slightly to cut through. Place the circles on your prepared baking sheet, spacing them about 1 inch apart. You should get 8 to 10 circles from one pound of dough. Gather the scraps, re-roll, and cut more if needed.
- Poke the dough. Use a fork to poke a few holes in each circle. This prevents the dough from puffing up too much in the middle. I forgot this once and ended up with pizza balloons—still tasty, but hard to decorate.
- Add the sauce. Spoon about 1 tablespoon of pizza sauce onto each circle. Use the back of the spoon to spread it evenly, leaving a small border for the crust. Don’t overload it—too much sauce makes the pizza soggy.
- Sprinkle the cheese. Evenly distribute the shredded mozzarella over the sauce. About 2 tablespoons per mini pizza is perfect. You want enough to cover the sauce but not so much that you can’t see the toppings.
- Create the faces. This is the fun part. Let the kids (or the kid in you) design each face. Place olive slices for eyes, a pepperoni slice for a mouth, mushroom slices for ears, and bell pepper strips for scars or eyebrows. Press the toppings gently into the cheese so they stick.
- Brush the crust. Using your pastry brush, lightly brush the exposed dough edges with olive oil. Sprinkle with garlic powder and Italian seasoning if using. This gives the crust that golden, flavorful finish.
- Bake for 10-12 minutes. Watch for the cheese to melt and bubble and the crust to turn golden brown. Every oven is different—mine runs hot, so I check at 10 minutes. The bottoms should be lightly browned when you lift one with a spatula.
- Cool for 2 minutes. Let the pizzas rest on the baking sheet for a couple of minutes before transferring. This helps the cheese set so toppings don’t slide off when you move them.
- Add fresh toppings. If using fresh basil leaves or cherry tomato halves, add them after baking. The residual heat will warm them slightly without wilting the basil or making the tomatoes mushy.
- Serve warm. Arrange on a platter and watch everyone grab their favorite face. They’re best eaten within 15 minutes of coming out of the oven.
Cooking Tips & Techniques
After making these Cozy Mini Halloween Pizza Faces more times than I can count, I’ve picked up a few tricks that make the process smoother and the results better.
Don’t overwork the dough. The more you handle pizza dough, the tougher it gets. Roll it out gently and cut your circles in one smooth motion. If the dough starts shrinking back, let it rest for 5 minutes before trying again.
Prep toppings before the kids arrive. Slice olives, dice peppers, and shred cheese ahead of time. I learned this the hard way when my nephew got bored waiting and started eating raw mushrooms off the cutting board. Having everything ready keeps the momentum going and the mess contained.
Use a light hand with sauce. I used to be generous with the sauce until I ended up with soggy-bottomed pizzas. A thin layer is all you need. The sauce spreads as it heats, so trust the process.
Bake on the middle rack. The bottom rack can burn the crust before the cheese melts, and the top rack can dry out the toppings. Middle rack gives you that perfect balance of crispy bottom and gooey top.
Let kids make mistakes. One year, my son made a face with all the toppings piled in the center. It looked like a monster with a unibrow and a lopsided mouth. He was so proud, and honestly, it tasted great. Perfection is overrated—fun is the goal.
Double the batch if feeding a crowd. These disappear fast. For a Halloween party, I make at least 20 mini pizzas. They reheat decently in a 350°F oven for 5 minutes, though they’re best fresh.
Variations & Adaptations
One of the best things about these Cozy Mini Halloween Pizza Faces is how adaptable they are. I’ve tried several variations over the years, and each one brought something new to the table.
Gluten-Free Version: Use gluten-free pizza dough or pre-made gluten-free crusts. Most store-bought options work well—just follow the package directions for baking time. I’ve also used cauliflower crusts, which are a bit trickier to cut into circles but work in a pinch.
Vegetarian-Friendly: Skip the pepperoni and load up on veggies. Roasted red pepper strips make excellent scary mouths, and artichoke hearts look like creepy brains. My vegetarian friend’s kids made faces with broccoli trees for hair—adorable and delicious.
Dairy-Free Option: Use dairy-free mozzarella shreds. They melt a bit differently (less stretchy, more creamy), but they still work beautifully. I recommend Miyoko’s or Violife brands for the best texture.
Breakfast Version: Swap pizza sauce for scrambled eggs and cheese, then use bacon bits for mouths and sausage rounds for eyes. My kids requested this for a Halloween morning breakfast, and it was a hit.
Dessert Version: Use cookie dough or pre-made sugar cookie crust, spread with Nutella or frosting, and decorate with candy eyes, licorice strings, and chocolate chips. This is my secret weapon for Halloween parties—the kids go wild.
Mini Bagel Version: If you’re short on time, use mini bagels or English muffins as the base. Toast them lightly, then add sauce, cheese, and toppings. Bake for 5-7 minutes. It’s a shortcut that works surprisingly well.
Serving & Storage Suggestions
These Cozy Mini Halloween Pizza Faces are best served warm, right after baking. The cheese is stretchy, the crust is crispy, and the toppings are perfectly positioned. Arrange them on a large wooden board or a festive Halloween platter for maximum visual impact.
For a Halloween party spread, pair them with:
- Veggie sticks with ranch dip (arranged to look like a broom)
- Spider-shaped fruit skewers (grapes and melon balls)
- Witch’s brew punch (limeade with dry ice for effect—keep it away from kids)
- Bat-shaped cookies for dessert
Storage: Leftover pizzas keep in an airtight container in the refrigerator for up to 3 days. The crust softens a bit, but they’re still tasty. To reheat, place them on a baking sheet in a 350°F oven for 5-7 minutes. The microwave works in a pinch, but the crust gets chewy.
Freezer Instructions: You can freeze the unbaked pizzas for up to 2 months. Assemble them on a parchment-lined baking sheet and freeze until solid, then transfer to a freezer bag. Bake directly from frozen, adding 3-4 minutes to the baking time. This is a lifesaver for busy Halloween nights.
Make-Ahead Tip: Prep all the toppings the day before and store them in separate containers. On the day of, all you have to do is roll, cut, assemble, and bake. The whole process takes less than 30 minutes.
Flavors develop nicely over time, so leftover pizzas taste even better the next day. The spices meld together, and the crust absorbs a bit of the sauce. My husband actually prefers them cold, straight from the fridge—but that might just be him.
Nutritional Information & Benefits
While these Cozy Mini Halloween Pizza Faces are definitely a treat, they’re not without some nutritional perks. Here’s a rough estimate per mini pizza (based on 8 servings):
| Nutrient | Amount Per Serving |
|---|---|
| Calories | 180-220 |
| Protein | 8-10g |
| Carbohydrates | 22-26g |
| Fat | 8-10g |
| Fiber | 1-2g |
| Sodium | 400-500mg |
Health Benefits: The mozzarella cheese provides calcium and protein for growing bodies. The tomato sauce offers lycopene, an antioxidant linked to heart health. If you load up on veggie toppings, you’re adding fiber, vitamins, and minerals. The olives contribute healthy monounsaturated fats.
Dietary Considerations: This recipe is vegetarian as written (omit pepperoni for a fully vegetarian version). For gluten-free, use gluten-free dough. For dairy-free, use dairy-free cheese. It’s naturally nut-free, making it safe for school parties.
Allergen Note: Contains wheat and dairy. Check your pizza dough label for potential soy or egg ingredients.
I’m not a nutritionist, and I firmly believe in balance. These pizzas are about joy and connection, not perfection. But it’s nice to know they’re not empty calories, either.
Conclusion
These Cozy Mini Halloween Pizza Faces are more than just a recipe—they’re a tradition in the making. Every time I make them, I remember Lucy’s olive eyes and the way her face lit up when she saw her creation come out of the oven. That’s the magic of cooking with kids: you’re not just feeding them, you’re giving them a chance to create, to experiment, and to be proud of something they made.
I hope you try these with your own family, your friends, or even just for yourself. Don’t be afraid to let the faces get silly or weird. The monster with three eyes and no mouth might be your favorite one. And if you come up with a combination I haven’t tried, please tell me about it—I’m always looking for new ideas.
Drop a comment below and share your best pizza face creations. Tag me on Pinterest with your photos—I love seeing what you come up with. And remember, sometimes the best recipes come from letting someone else take the lead, even if they’re only seven years old.
Happy Halloween, and happy cooking.
Frequently Asked Questions
Can I make these Cozy Mini Halloween Pizza Faces ahead of time?
Yes! Assemble them on the baking sheet, cover with plastic wrap, and refrigerate for up to 24 hours before baking. Add 2-3 minutes to the baking time since they’ll be cold from the fridge.
What if I don’t have round cookie cutters?
No problem. Use a clean tuna can, a drinking glass with a thin rim, or even a mason jar lid. You can also cut the dough into squares or triangles—monster faces don’t have to be round.
Can I use pre-made mini pizza crusts?
Absolutely. Pre-made mini crusts, naan bread, or even pita pockets work great. Just adjust the baking time based on the crust thickness. Check at 8 minutes for thinner bases.
How do I keep the toppings from falling off?
Press the toppings gently into the cheese before baking. Avoid overloading each pizza—stick to 3-4 toppings per face. Let the pizzas cool for 2 minutes after baking so the cheese sets.
My kids are picky eaters. Will they like these?
Probably yes! The fun of designing their own faces makes kids more willing to try new toppings. Start with familiar ingredients like pepperoni and cheese, then introduce one new veggie at a time. Let them choose what goes on—ownership is everything.
Pin This Recipe!
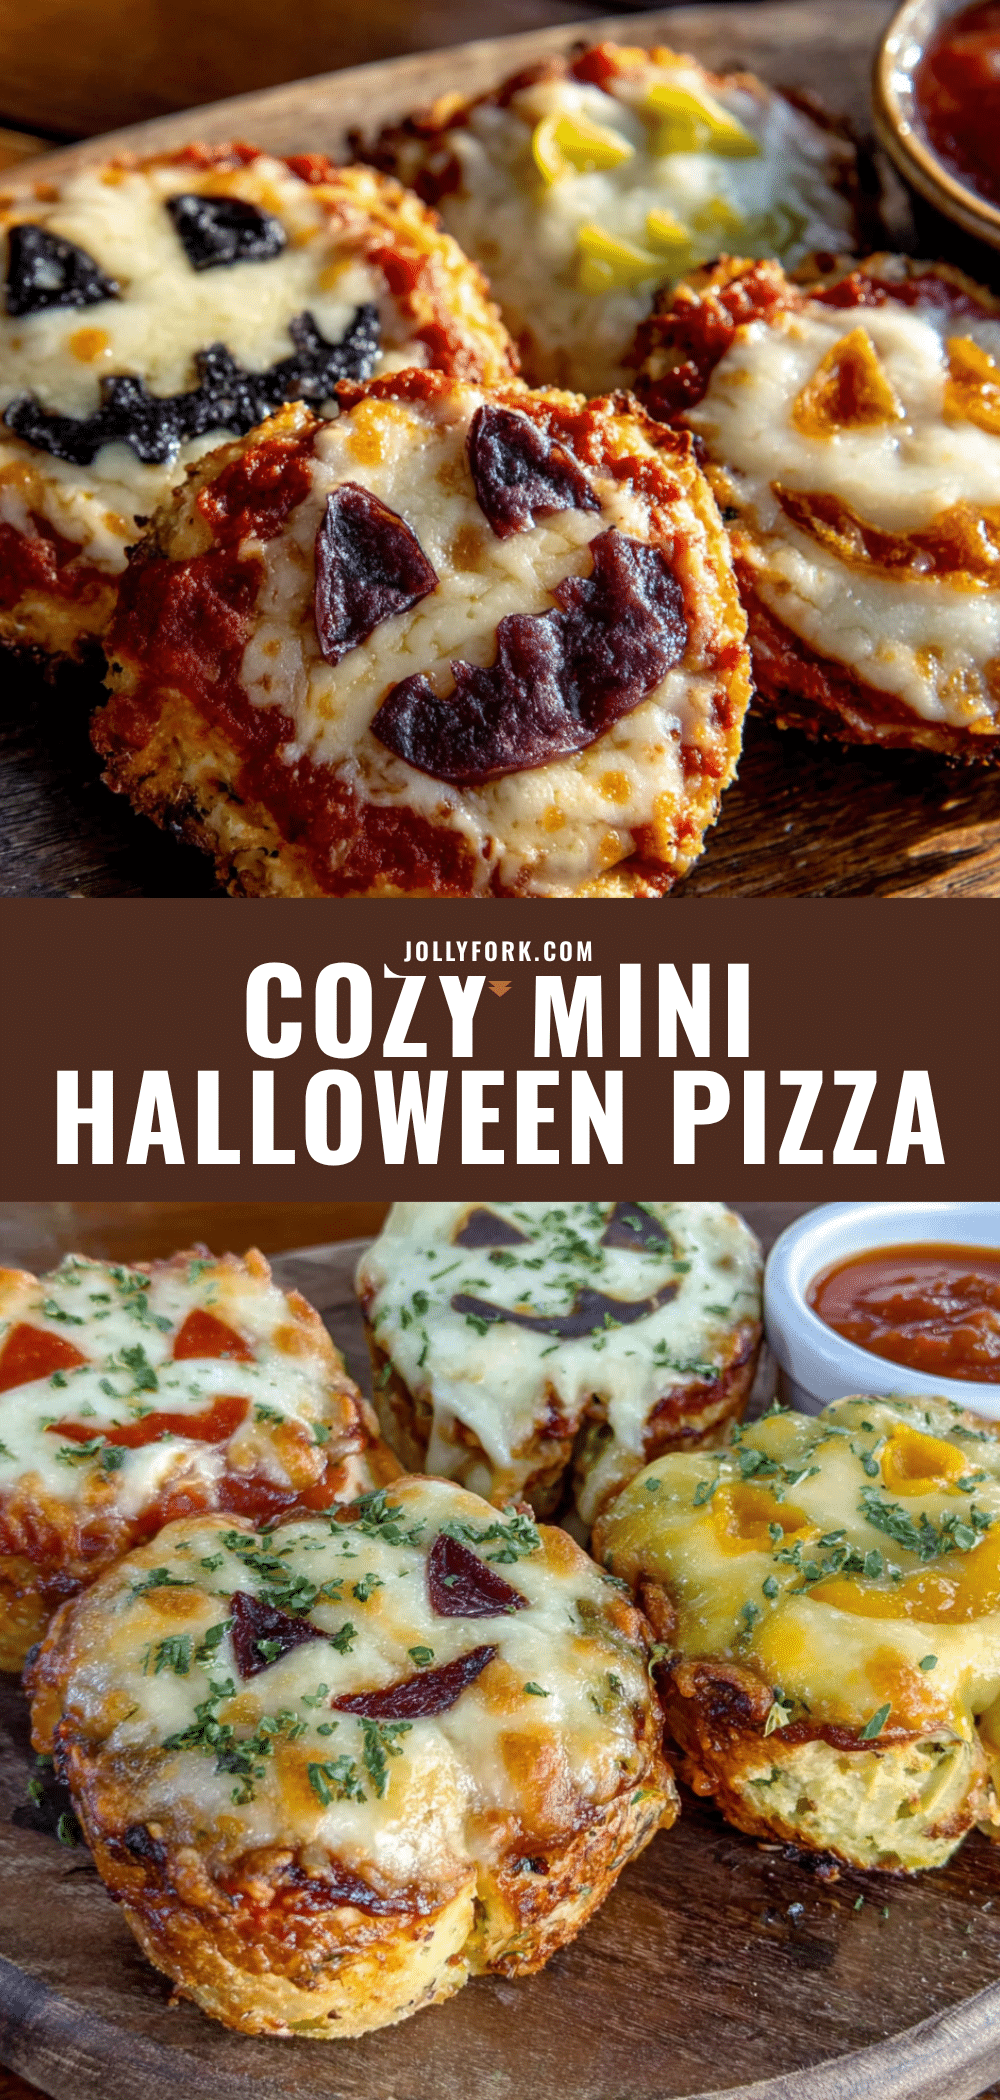
Cozy Mini Halloween Pizza Faces Kids Love
These Cozy Mini Halloween Pizza Faces are quick, customizable, and perfect for a fun Halloween activity. Kids love designing their own monster faces with simple ingredients like olives, pepperoni, and bell peppers.
- Prep Time: 15 minutes
- Cook Time: 12 minutes
- Total Time: 27 minutes
- Yield: 8 servings 1x
- Category: Main Course
- Cuisine: American
Ingredients
- 1 pound pizza dough (store-bought or homemade, room temperature)
- ½ cup pizza sauce
- 1 ½ cups shredded low-moisture mozzarella cheese
- ¼ cup pepperoni slices
- ¼ cup sliced black olives
- ¼ cup diced bell peppers (any color)
- ¼ cup sliced mushrooms
- Small handful fresh basil leaves
- ¼ cup halved cherry tomatoes
- 1 tablespoon olive oil
- ½ teaspoon garlic powder (optional)
- ½ teaspoon Italian seasoning (optional)
Instructions
- Preheat oven to 425°F (220°C). Line a baking sheet with parchment paper.
- Let pizza dough sit at room temperature for 20 minutes. Lightly flour a work surface and rolling pin. Roll dough to about ¼-inch thickness.
- Using a round cookie cutter (3-4 inches) or a drinking glass, cut dough into circles. Place on prepared baking sheet, spacing 1 inch apart. Gather scraps, re-roll, and cut more circles as needed.
- Poke a few holes in each circle with a fork to prevent puffing.
- Spoon about 1 tablespoon of pizza sauce onto each circle and spread evenly, leaving a small border for the crust.
- Sprinkle about 2 tablespoons of shredded mozzarella over the sauce on each pizza.
- Create faces: Place olive slices for eyes, pepperoni for mouths, mushroom slices for ears, bell pepper strips for scars or eyebrows. Press toppings gently into the cheese.
- Brush exposed dough edges with olive oil. Sprinkle with garlic powder and Italian seasoning if desired.
- Bake for 10-12 minutes, until cheese is melted and bubbly and crust is golden brown.
- Let pizzas cool on baking sheet for 2 minutes before transferring.
- Add fresh toppings like basil leaves or cherry tomato halves after baking.
- Serve warm.
Notes
Prep toppings ahead of time to keep kids engaged. Use a light hand with sauce to avoid soggy bottoms. Bake on the middle rack for best results. Let kids make mistakes—fun is the goal. For a crowd, double the batch. Leftovers keep in the fridge for up to 3 days; reheat in a 350°F oven for 5-7 minutes. Unbaked pizzas can be frozen for up to 2 months.
Nutrition
- Serving Size: 1 mini pizza
- Calories: 200
- Sugar: 3
- Sodium: 450
- Fat: 9
- Saturated Fat: 4
- Carbohydrates: 24
- Fiber: 1.5
- Protein: 9
Keywords: Halloween pizza, mini pizza, kids recipe, Halloween food, pizza faces, easy dinner, fun food