I’d spent the better part of a decade claiming I wasn’t a Halloween person. The plastic decorations, the overpriced candy, the pressure to throw some elaborate party—it all felt like too much. Honestly, I’d rather just hand out full-size candy bars from a bowl and call it a night. Then last October, my sister-in-law showed up at my door holding a tray of these little black cat truffles, and I found myself eating three of them before she even got her coat off. The crunch of the Oreo, the creaminess of the cream cheese, the perfect little candy eyes staring up at me—I was caught. She didn’t say a word, just smiled, and I knew I had to get the recipe. Maybe you’ve been there, rolling your eyes at themed desserts until one bites you back. These black cat Oreo truffles are that dessert. They’re the reason I now own a set of Halloween cookie cutters and a deep sense of shame about my former attitude. Let me tell you, they’re worth the conversion.
Why You’ll Love This Recipe
Let’s be real for a second. You’re busy, you’re tired, and the last thing you need is a complicated Halloween project that leaves your kitchen looking like a crime scene. These truffles are the opposite of that. They come together in under 30 minutes of active time, and they look like you fussed for hours. The best part? No oven required. None. Zero. You’re welcome.
- Quick & Easy: From start to finish, you’re looking at about 20 minutes of hands-on work. The hardest part is waiting for them to chill in the fridge.
- Simple Ingredients: You probably have most of this stuff already. Oreos, cream cheese, chocolate chips, and some candy eyes. That’s it. No weird specialty items.
- Perfect for Halloween Parties: Whether it’s a school party, a work potluck, or just a fun treat for the kids, these little guys steal the show every time.
- Crowd-Pleaser: I’ve made these for groups of kids and groups of adults, and the reactions are identical—wide eyes and sticky fingers. They disappear fast.
- Unbelievably Delicious: The texture is this perfect combo of soft and crunchy, with that rich Oreo flavor that just hits different. It’s comfort food in a bite-sized package.
What makes this recipe different from every other truffle recipe out there? It’s the shape, honestly. Rolling them into little cat heads instead of boring balls transforms them from a generic dessert into a conversation piece. Plus, the black candy melts give them that glossy, professional finish that makes people think you bought them from a bakery. I’ve tested this exact method about six times to get the proportions right—not too much cream cheese, not too little chocolate—so you don’t have to guess. This recipe is the one I’d make for my own Halloween party, and I’m pretty picky about that stuff now.
What Ingredients You Will Need
This recipe relies on a short list of pantry-friendly ingredients that work together to create something magical. Each one has a specific job, and I’ve tested a few brands to find what works best. Here’s what you’ll need to gather:
For the Truffle Base
- 1 package (14.3 oz) Oreo cookies (regular, not Double Stuf—the filling ratio matters for texture)
- 8 oz cream cheese, softened (full-fat works best, but Neufchâtel is fine too; just make sure it’s at room temperature so it blends smoothly)
For the Coating and Decorations
- 12 oz black candy melts (I prefer Wilton brand for the smoothest melt, but any brand works as long as you melt them slowly)
- 1 tablespoon coconut oil or vegetable shortening (this helps thin the candy melts for a smoother dip)
- Candy eyes (the small half-sphere ones work best—about 36-40 pieces)
- Black licorice strings or black decorating gel (for whiskers; I’ve used both and prefer the gel for ease)
- Pink candy melts or pink icing (optional, for little noses—about a tablespoon is plenty)
Ingredient Notes and Substitutions
I’ve made these with reduced-fat cream cheese before, and honestly, the texture was a little softer and harder to shape. Stick with full-fat if you can. For the Oreos, the regular ones crush up better than the Double Stuf version, which has too much filling and makes the mixture greasy. If you need a gluten-free option, use gluten-free Oreo-style cookies—they work just as well. The candy melts can be swapped for dark or milk chocolate chips mixed with a teaspoon of coconut oil, but the black color won’t be as intense. For a nut-free version, you’re already good to go—none of the ingredients contain nuts, but always check the labels on your candy melts just in case.
Equipment Needed
You don’t need a fancy kitchen to pull these off. Here’s the basic gear:
- Food processor (or a sturdy zip-top bag and a rolling pin for crushing Oreos manually—I’ve done both, and the food processor is way less messy)
- Large mixing bowl
- Baking sheet lined with parchment paper
- Microwave-safe bowl (for melting the candy melts)
- Fork or dipping tool (a regular dinner fork works fine, or you can buy a fancy truffle dipping tool—I just use a fork)
- Small piping bag or zip-top bag (for the pink noses and whiskers)
- Toothpicks (helpful for fixing any coating mistakes)
If you don’t have a food processor, no worries. Put the Oreos in a zip-top bag, seal it tight, and go to town with a rolling pin. It’s a little arm workout, but it works. I’ve also used a high-powered blender in a pinch, though it tends to crush them too fine. The food processor gives you that perfect crumb texture—fine but not dusty.
Preparation Method
Alright, let’s get these cats made. Take your time with each step, and don’t rush the chilling process—it makes a huge difference. Here’s how it goes:
- Crush the Oreos. Place the entire package of Oreos (filling and all) into your food processor. Pulse about 10-12 times until you get fine crumbs. You want them to look like wet sand—no big chunks of cookie left. If you’re using the bag method, crush until you can’t feel any large pieces when you squeeze the bag.
- Mix in the cream cheese. Add the softened cream cheese to the food processor with the Oreo crumbs. Pulse another 5-6 times until everything comes together into a uniform dough. It should look dark brown and hold together when you pinch it. If it feels too dry, add another tablespoon of cream cheese. Too sticky? Add a few more crushed Oreos.
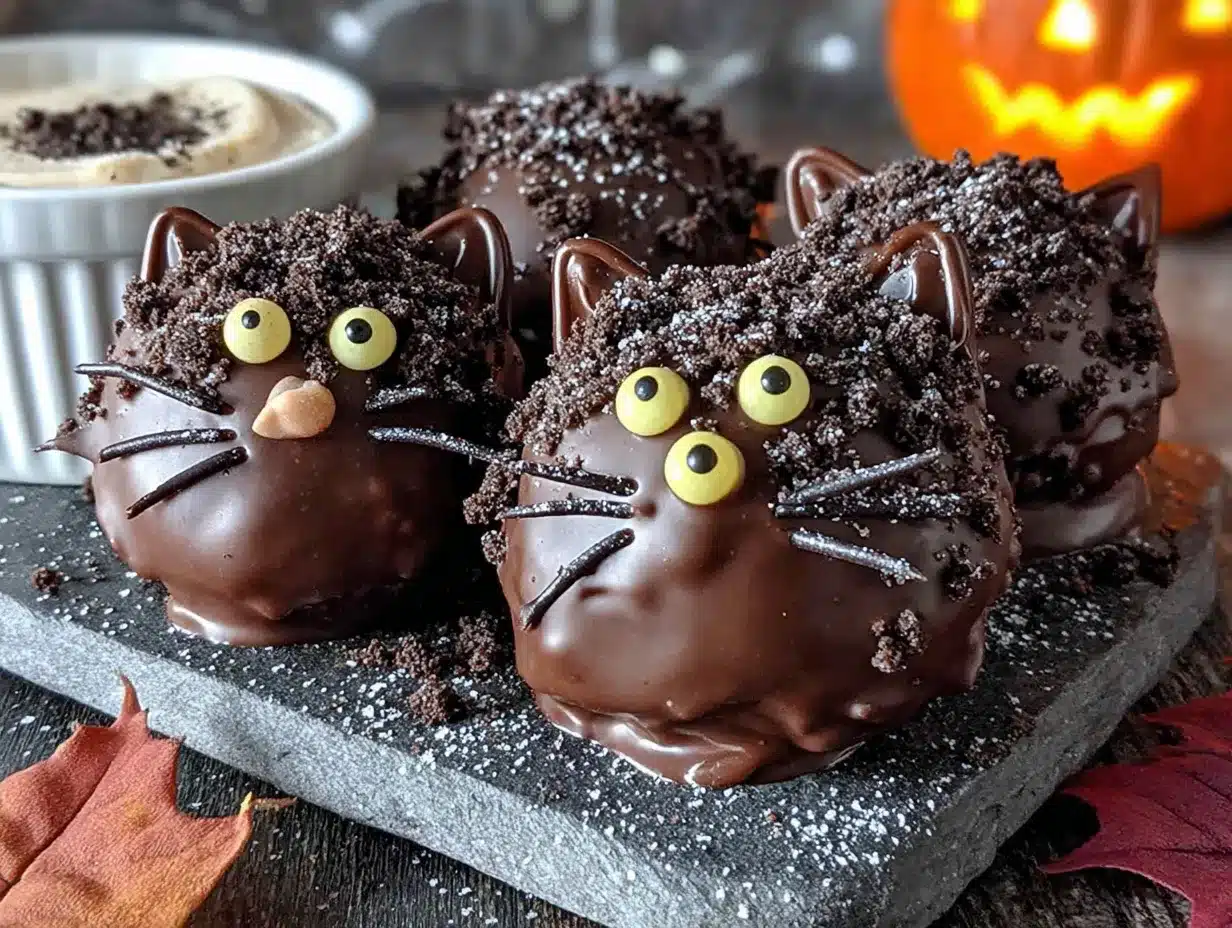
- Shape the cat heads. Scoop out about 1 tablespoon of the mixture and roll it into a ball. Then gently pinch the top to form two little pointed ears. Place each shaped truffle on your parchment-lined baking sheet. Don’t stress about making them perfect—cats come in all shapes, and a little asymmetry looks charming. Repeat until all the mixture is used up. You should get about 18-20 truffles.
- Chill the truffles. Pop the baking sheet into the refrigerator for at least 30 minutes. This step is non-negotiable. If you try to dip warm truffles, they’ll fall apart in the chocolate. I’ve made that mistake, and it’s not pretty. Let them get firm to the touch.
- Melt the candy melts. Place the black candy melts in a microwave-safe bowl. Microwave in 30-second intervals, stirring well after each, until completely smooth. Add the coconut oil or shortening and stir until it’s fully incorporated. This thins the coating so it’s easier to dip. Be careful not to overheat—candy melts can seize up if they get too hot.
- Dip the truffles. Working with one truffle at a time, drop it into the melted candy. Use a fork to gently turn it until fully coated. Lift it out with the fork, tap the fork gently on the edge of the bowl to let excess drip off, and then slide it back onto the parchment paper. If you see a little pool of chocolate forming at the bottom, that’s normal. You can clean it up later with a toothpick.
- Add the eyes immediately. Before the coating sets, press two candy eyes onto each truffle. They should stick right into the wet chocolate. Work quickly here—once the coating hardens, the eyes won’t stay put.
- Let the coating set. Place the baking sheet back in the refrigerator for about 10-15 minutes, or until the coating is firm and no longer tacky to the touch.
- Add the faces. Once the coating is set, use your piping bag with pink candy melts or icing to add a tiny triangle nose in the center of each face. Then use black decorating gel or licorice strings to add whiskers—three on each side, curving outward. If you’re using gel, a toothpick can help you draw thin lines.
- Final chill. Pop them back in the fridge for another 10 minutes to set the faces. Then they’re ready to serve!
A quick note: if your candy melts start to thicken while you’re dipping, just pop the bowl back in the microwave for 10 seconds and stir. Don’t add more liquid—that can ruin the texture. And if a truffle cracks while dipping, don’t panic. Just let the coating set, then give it a second dip to cover the crack. I’ve done this more times than I’d like to admit, and it always works.
Cooking Tips & Techniques
I’ve made these truffles about a dozen times now, and I’ve learned a few things the hard way. Let me save you some trouble.
Don’t overwork the dough. When you’re mixing the Oreo crumbs and cream cheese, stop as soon as it comes together. Overmixing can make the truffles dense and greasy. You want them tender, not tough.
Keep your hands cold. The warmth from your hands can soften the truffle mixture, making it harder to shape. If the dough starts getting sticky, wash your hands in cold water and dry them well before continuing. I’ve also popped the mixing bowl in the fridge for 10 minutes when things got too warm.
Use a deep bowl for dipping. A narrow, deep bowl works better than a wide, shallow one for the candy melts. You want to be able to submerge the truffle completely without having to use a ton of coating. A small cereal bowl or a glass measuring cup works great.
Work in small batches. Don’t take all the chilled truffles out of the fridge at once. Keep them cold until you’re ready to dip each one. The colder they are, the cleaner the dip. I usually take out 3-4 at a time.
Troubleshooting cracked coating. If your coating cracks after setting, it usually means the truffle was too cold when you dipped it, or the coating was too thick. Let the truffles sit at room temperature for 2-3 minutes before dipping, and make sure your candy melts are thin enough to flow smoothly.
One time, I forgot to add the coconut oil to the candy melts, and the coating was so thick it looked like I’d dipped the truffles in tar. Not cute. That little bit of oil makes all the difference. Don’t skip it.
Variations & Adaptations
Once you’ve mastered the basic black cat, you can get creative. Here are some of my favorite twists:
- White Cat Truffles: Use white candy melts instead of black, and add pink ears and a pink nose. These are adorable for a winter-themed party or a cat lover who prefers lighter colors.
- Pumpkin Spice Truffles: Add 1 teaspoon of pumpkin pie spice to the Oreo mixture before shaping. The warm spices pair beautifully with the chocolate. Roll them into little pumpkin shapes instead of cat heads, and use green icing for stems.
- Vegan Version: Use vegan cream cheese and dairy-free Oreos (the original Oreos are actually vegan!). Swap the candy melts for a dairy-free dark chocolate coating. The texture is slightly softer, but the flavor is still fantastic.
- Peppermint Cat Truffles: Crush a few peppermint candies and mix them into the Oreo crumbs. Use white candy melts with a swirl of red for a festive holiday look. My kids went crazy for these last December.
- Gluten-Free Option: Use gluten-free chocolate sandwich cookies. The texture is a little crumblier, so you might need an extra tablespoon of cream cheese to bind it. I’ve tested this with two different brands, and both worked well.
I tried a version once where I added a teaspoon of orange extract to the mixture, thinking it would give a subtle citrus note. It was… fine. Not bad, but not amazing either. Stick with the original or try the pumpkin spice—those are the winners.
Serving & Storage Suggestions
These truffles are best served chilled, straight from the fridge. The coating stays snappy, and the inside is perfectly creamy. Arrange them on a platter with some orange and black sprinkles scattered around for a festive look. I like to place them on a bed of shredded black paper (the kind you find in gift bags) for a spooky effect.
For a Halloween party, set them out about 15 minutes before guests arrive so they soften slightly. They’re easier to bite into when they’re not rock-hard cold. If you’re serving them at a school event or potluck, keep them in a cooler or on a tray with ice packs underneath—they can get soft in warm weather.
Storage: Store the truffles in an airtight container in the refrigerator for up to 1 week. Layer them between sheets of parchment paper so the faces don’t smudge. I’ve also kept them in the freezer for up to 3 months—just thaw them in the fridge overnight before serving. Don’t let them sit at room temperature for more than 2 hours, especially if you’re using cream cheese.
The flavors actually meld together beautifully after a day or two in the fridge. The Oreo crumbs soften slightly, and the cream cheese flavor becomes more subtle. Honestly, I think they taste even better on day two—if they last that long.
Nutritional Information & Benefits
Let’s be honest—these are a treat, not a health food. But here’s the breakdown for one truffle (based on 20 servings):
- Calories: Approximately 180
- Fat: 11g
- Carbohydrates: 20g
- Protein: 2g
- Sugar: 14g
The cream cheese adds a small amount of calcium and protein, and the dark chocolate coating (if you use it) provides antioxidants. But really, these are about joy, not nutrition. They’re a once-a-year Halloween indulgence, and that’s perfectly okay. If you’re watching your sugar intake, you can use sugar-free Oreos and sugar-free chocolate, though the texture will be slightly different.
One truffle is usually enough to satisfy a sweet tooth, but I won’t judge you if you eat two. Or three. I’ve been there.
Conclusion
These black cat Oreo truffles are the Halloween dessert you didn’t know you needed. They’re quick, they’re cute, and they taste like childhood in the best possible way. The best part? They’re forgiving. If your cat ears look lopsided or your whiskers are a little wonky, that’s just character. Real cats aren’t perfect either.
I’d love to see how yours turn out! Drop a comment below and tell me about your Halloween plans, or share a photo of your truffles. Did you try a variation? Did your kids help shape the cats? I read every comment, and nothing makes me happier than hearing about your kitchen adventures. If you loved this recipe, share it with a friend who needs a last-minute Halloween dessert idea. Trust me, they’ll thank you.
Happy Halloween, and happy snacking!
Frequently Asked Questions
Can I use Double Stuf Oreos for this recipe?
I don’t recommend it. The extra filling throws off the ratio of cookie to cream cheese, making the mixture too soft and greasy. Stick with regular Oreos for the best texture.
How do I keep the candy melts from seizing up?
Make sure your bowl is completely dry—even a drop of water can cause candy melts to seize. Also, melt them slowly in 30-second intervals and stir well between each. Adding a little coconut oil helps keep the texture smooth.
Can I make these ahead of time?
Absolutely! You can make them up to 3 days in advance and store them in the fridge. They actually taste better after a day or two as the flavors meld together. You can also freeze them for up to 3 months.
What can I use instead of candy eyes?
If you don’t have candy eyes, you can use small white chocolate chips or white candy melts piped into dots. Let them set before adding a tiny dot of black gel for the pupil. It takes a little more work, but it looks just as cute.
My truffles are too soft to shape. What went wrong?
This usually happens if the cream cheese was too warm or if you used reduced-fat cream cheese. Pop the mixture in the fridge for 15-20 minutes to firm it up before shaping. If it’s still too soft, add a few more crushed Oreos to absorb the excess moisture.
Pin This Recipe!

Easy Black Cat Oreo Truffles: Best Halloween Dessert

These no-bake black cat Oreo truffles are the perfect Halloween treat. Made with just a few simple ingredients, they come together in under 30 minutes and are sure to be a crowd-pleaser at any party.
- Prep Time: 20 minutes
- Cook Time: 0 minutes
- Total Time: 1 hour (including chilling)
- Yield: 18-20 truffles 1x
- Category: Dessert
- Cuisine: American
Ingredients
- 1 package (14.3 oz) Oreo cookies (regular, not Double Stuf)
- 8 oz cream cheese, softened (full-fat recommended)
- 12 oz black candy melts (Wilton brand preferred)
- 1 tablespoon coconut oil or vegetable shortening
- Candy eyes (small half-sphere, about 36-40 pieces)
- Black licorice strings or black decorating gel (for whiskers)
- Pink candy melts or pink icing (optional, for noses)
Instructions
- Crush the Oreos: Place the entire package of Oreos (filling and all) into a food processor. Pulse about 10-12 times until you get fine crumbs that look like wet sand.
- Mix in the cream cheese: Add the softened cream cheese to the food processor with the Oreo crumbs. Pulse another 5-6 times until everything comes together into a uniform dough. It should hold together when pinched.
- Shape the cat heads: Scoop out about 1 tablespoon of the mixture and roll it into a ball. Gently pinch the top to form two little pointed ears. Place on a parchment-lined baking sheet. Repeat until all mixture is used (about 18-20 truffles).
- Chill the truffles: Refrigerate the baking sheet for at least 30 minutes until firm.
- Melt the candy melts: Place black candy melts in a microwave-safe bowl. Microwave in 30-second intervals, stirring well after each, until completely smooth. Stir in coconut oil or shortening until fully incorporated.
- Dip the truffles: Working one at a time, drop a truffle into the melted candy. Use a fork to turn it until fully coated. Lift out, tap fork on bowl edge to remove excess, and slide back onto parchment paper.
- Add the eyes immediately: Before the coating sets, press two candy eyes onto each truffle.
- Let the coating set: Refrigerate for 10-15 minutes until coating is firm and no longer tacky.
- Add the faces: Use a piping bag with pink candy melts or icing to add a tiny triangle nose. Use black decorating gel or licorice strings to add whiskers (three on each side, curving outward).
- Final chill: Refrigerate for another 10 minutes to set the faces. Serve chilled.
Notes
Don’t overwork the dough. Keep your hands cold when shaping. Use a deep bowl for dipping. Work in small batches, keeping truffles cold until dipping. If coating cracks, let truffles sit at room temperature for 2-3 minutes before dipping. Store in an airtight container in the refrigerator for up to 1 week or freeze for up to 3 months.
Nutrition
- Serving Size: 1 truffle
- Calories: 180
- Sugar: 14
- Sodium: 120
- Fat: 11
- Saturated Fat: 6
- Carbohydrates: 20
- Fiber: 1
- Protein: 2
Keywords: Halloween dessert, Oreo truffles, black cat truffles, no-bake dessert, easy Halloween treat, Oreo cream cheese truffles


