My sister showed up at my door on a Tuesday afternoon in early November, holding a bottle of bourbon and looking apologetic. “I told my boss I’d bring dessert for the Friendsgiving tomorrow,” she said. “And I totally forgot.” The fridge held a block of cream cheese, a can of pumpkin puree I’d bought on sale, and a sleeve of graham crackers that were probably past their prime. I had exactly one hour before I needed to pick up my kid from school. So I did what any reasonable person would do—I threw everything into a mixing bowl and prayed.
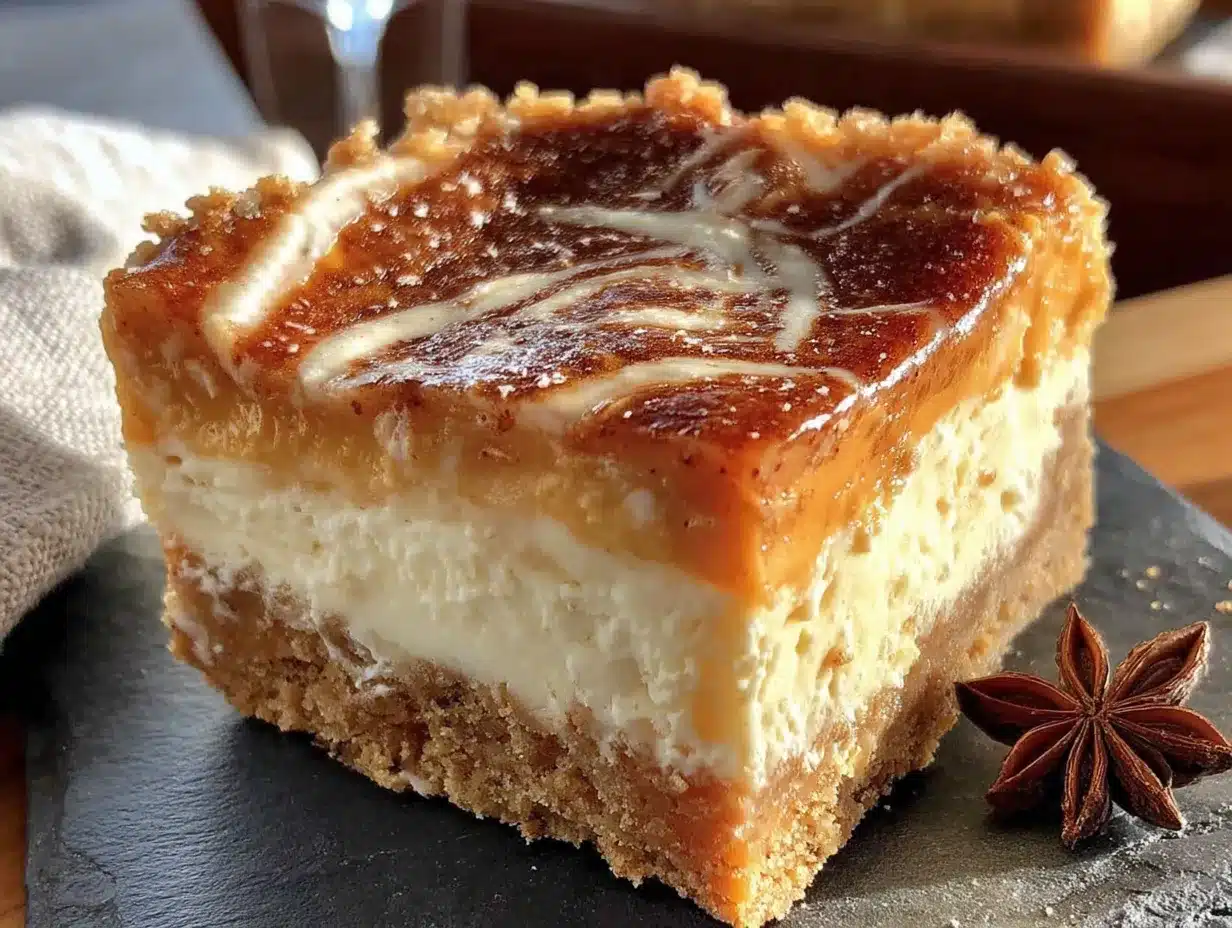
What came out of that oven was honestly better than it had any right to be. The pumpkin cheesecake layer was silky and spiced, the shortbread crust held together without crumbling, and the whole thing sliced into neat little bars that looked like I’d spent all day on them. My sister’s Friendsgiving was a hit, and I’ve been making these Perfect Make-Ahead Pumpkin Pie Cheesecake Bars every fall since. They’re the kind of dessert that makes you look like you have your life together, even when you clearly don’t.
The best part? These bars actually get better after a day in the fridge. The flavors meld together, the texture firms up perfectly, and you can make them three days ahead without anyone knowing they weren’t baked that morning. It’s become my secret weapon for every holiday gathering, potluck, and “I need to bring something” moment from October through December. Trust me on this one.
Why You’ll Love This Recipe
I have tested this recipe at least seven times over the past three years, and I can tell you with complete confidence that it works every single time. The combination of a buttery shortbread crust, a creamy pumpkin cheesecake filling, and a subtle spice blend creates something that tastes far more complicated than it actually is.
- Make-Ahead Magic : These bars need at least 4 hours to chill, but they actually taste better on day two or three. You can prep them up to 3 days in advance and just slice and serve when you’re ready.
- No Water Bath Required : Unlike a full cheesecake, these bars bake at a lower temperature and don’t need a fussy water bath. No cracked tops, no soggy crusts, no stress.
- Simple Pantry Ingredients : Cream cheese, pumpkin puree, eggs, sugar, and basic spices. Nothing weird or hard to find.
- Perfect for Crowds : One 9×13 pan makes 16 generous bars. Great for Thanksgiving, Friendsgiving, office parties, or holiday cookie exchanges.
- Freezer-Friendly : Wrap them up and freeze for up to 3 months. Thaw overnight in the fridge and they’re good as new.
What makes these bars different from every other pumpkin cheesecake recipe out there is the crust. Most recipes use a standard graham cracker crust that gets soggy by day two. I use a shortbread-style crust that stays crisp even after three days in the fridge. It’s a small change that makes a huge difference. Plus, the spice blend is perfectly balanced—not too heavy on the cinnamon, with just enough ginger and nutmeg to remind you it’s fall without tasting like a candle.
These bars are the kind of dessert that makes people close their eyes after the first bite. It’s comfort food reimagined—familiar enough to feel nostalgic, but special enough to feel like an occasion. Perfect for impressing guests without spending all day in the kitchen.
What Ingredients You Will Need
This recipe uses simple, wholesome ingredients that you probably already have in your pantry and fridge. The magic happens when they come together in the right proportions. Here’s what you need, broken down by component.
For the Shortbread Crust
- 1 ½ cups all-purpose flour (spooned and leveled—don’t scoop directly from the bag)
- ½ cup powdered sugar (not granulated! Powdered sugar gives the crust a melt-in-your-mouth texture)
- ¾ cup unsalted butter, cold and cut into small cubes (I use Kerrygold or Plugrà for the best flavor)
- ¼ teaspoon salt (fine sea salt or table salt works fine)
For the Pumpkin Cheesecake Filling
- 16 ounces cream cheese, softened to room temperature (full-fat is best for texture, but ⅓ less fat works too)
- 1 cup granulated sugar
- 1 cup pumpkin puree (not pumpkin pie filling—make sure it’s 100% pure pumpkin. Libby’s is my go-to)
- 3 large eggs, room temperature
- 1 teaspoon vanilla extract (pure, not imitation, if you have it)
- 2 teaspoons pumpkin pie spice (or make your own: 1 teaspoon cinnamon, ½ teaspoon ginger, ¼ teaspoon nutmeg, ¼ teaspoon allspice)
- ½ teaspoon cinnamon (extra, because I’m a cinnamon person)
- ¼ teaspoon salt
For the Optional Topping
- 1 cup heavy cream, cold
- 2 tablespoons powdered sugar
- ½ teaspoon vanilla extract
- Crushed pecans or candied pepitas for garnish (optional but pretty)
A quick note on cream cheese: Make sure it’s truly softened. If it’s cold, your filling will be lumpy. I take mine out of the fridge about an hour before I start baking. If you forget, you can microwave it in 10-second bursts, but be careful not to melt it. The same goes for the eggs—room temperature eggs incorporate much more smoothly into the batter. If you’re in a hurry, place the eggs in a bowl of warm water for 5 minutes.
For the pumpkin puree, I’ve tried several brands and Libby’s consistently gives the best texture and color. Store brands work fine too, just make sure you’re not grabbing pumpkin pie filling by accident. That stuff has sugar and spices already added, and it will throw off the whole recipe.
Equipment Needed
You don’t need any fancy equipment for these bars, which is part of why I love this recipe so much. Here’s what you’ll need:
- 9×13-inch baking pan (metal or glass both work, but metal gives a crispier crust)
- Parchment paper (for easy removal—trust me, you want this)
- Electric hand mixer or stand mixer (you can do it by hand with a whisk, but your arm will get tired)
- Large mixing bowls (one for the crust, one for the filling)
- Food processor or pastry cutter (for the crust—you can also use your fingertips, but a food processor makes it faster)
- Rubber spatula (for scraping every last bit of filling into the pan)
- Sharp knife (for clean slices—run it under hot water between cuts)
If you don’t have a food processor, no worries. Just cut the cold butter into the flour mixture using a pastry cutter or two forks until it looks like coarse sand. It takes a little longer but works just as well. I actually prefer doing it by hand sometimes because there’s less cleanup.
One tip: invest in good parchment paper. The cheap stuff curls up and won’t stay in place. Fold the edges over the sides of the pan so it stays put while you press in the crust. You can also use non-stick foil in a pinch.
Preparation Method
Let’s get baking. This recipe takes about 30 minutes of active prep time and 45 minutes of baking. The hardest part is waiting for them to chill.
- Preheat your oven to 350°F (175°C). Line your 9×13 pan with parchment paper, leaving a 2-inch overhang on the long sides. This creates handles for lifting the bars out later.
- Make the shortbread crust. In a food processor, pulse together the flour, powdered sugar, and salt. Add the cold butter cubes and pulse until the mixture looks like coarse meal with some pea-sized butter bits remaining. Don’t over-process—you want texture, not paste. If doing by hand, cut the butter into the dry ingredients using a pastry cutter.
- Press the crust into the pan. Dump the crumbly mixture into your prepared pan and press it down firmly and evenly. I use the bottom of a measuring cup to get it really flat. The crust should be about ¼-inch thick. Bake for 15-18 minutes until the edges are just starting to turn golden. Set aside to cool slightly while you make the filling. Leave the oven on.
- Beat the cream cheese. In a large bowl, beat the softened cream cheese with an electric mixer on medium speed until smooth and creamy, about 2 minutes. Scrape down the sides and bottom of the bowl with a spatula.
- Add the sugar. Add the granulated sugar and beat until combined, about 1 minute. Scrape the bowl again.
- Add the pumpkin and spices. Add the pumpkin puree, pumpkin pie spice, extra cinnamon, and salt. Beat on low speed until just combined. Don’t over-mix or you’ll incorporate too much air.
- Add the eggs one at a time. Add the vanilla extract, then add the eggs one at a time, beating on low speed after each addition just until the yolk disappears. Over-mixing at this stage can cause cracks during baking. The batter should be smooth, thick, and a beautiful orange color.
- Pour the filling over the crust. Pour the pumpkin cheesecake filling over the pre-baked crust and spread it evenly with a spatula. Give the pan a gentle tap on the counter to release any air bubbles.
- Bake the bars. Bake at 350°F for 38-45 minutes. The edges should be set and slightly puffed, but the center should still jiggle slightly when you gently shake the pan. It will continue to set as it cools. If the top starts browning too quickly, tent loosely with foil for the last 10 minutes.
- Cool completely. Place the pan on a wire rack and let it cool to room temperature, about 1-2 hours. Then cover with plastic wrap and refrigerate for at least 4 hours, preferably overnight. This is the most important step—don’t skip it!
- Slice and serve. Once fully chilled, use the parchment paper handles to lift the entire block out of the pan. Place on a cutting board and use a sharp knife to slice into 16 bars (4 rows by 4 rows). Wipe the knife clean between cuts for neat edges.
- Make the whipped cream (optional). In a chilled bowl, beat the heavy cream, powdered sugar, and vanilla until soft peaks form. Pipe or dollop onto each bar and sprinkle with crushed pecans or pepitas.
A few things to watch for: If your cream cheese is too cold, you’ll get lumps that won’t go away. If your eggs are cold, they’ll seize up the batter. If you over-mix, your cheesecake will puff up in the oven and then crack as it cools. I’ve made all these mistakes, so you don’t have to.
Cooking Tips & Techniques
After making these bars more times than I can count, I’ve picked up a few tricks that make a real difference. Here are the ones I wish someone had told me from the start.
Don’t skip the parchment paper. I know it seems like an extra step, but trying to cut these bars straight from the pan is a nightmare. The parchment handles let you lift the whole thing out and get perfect slices. Learned this the hard way when I spent 20 minutes digging out the first batch.
Room temperature ingredients are non-negotiable. Cold cream cheese and cold eggs will give you a lumpy, curdled-looking batter. It won’t bake evenly and the texture will be off. Set everything out an hour before you start. If you forget, cut the cream cheese into cubes and microwave for 10 seconds at a time until soft.
Bake until the edges are set but the center jiggles. This is the golden rule of cheesecake baking. If you wait until the center is completely firm, you’ve over-baked it. The residual heat will finish cooking the center as it cools. I usually start checking at 38 minutes and go from there.
Let them cool slowly. Rapid temperature changes cause cracks. Let the bars cool on the counter for at least an hour before moving them to the fridge. If you’re in a hurry, you can pop them in the fridge after 30 minutes, but cover them loosely so condensation doesn’t drip onto the surface.
Use a hot knife for clean slices. Run your knife under hot water, dry it off, and make one clean cut. Wipe the blade clean, reheat, and repeat. It takes an extra minute but gives you bakery-quality slices. I learned this from watching my grandmother make her famous cheesecake.
Make them a day ahead. Seriously. These bars are better on day two. The flavors meld together, the texture becomes ultra-creamy, and the crust stays perfectly crisp. I always make mine the day before any event.
Variations & Adaptations
One of the best things about this recipe is how flexible it is. Here are some variations I’ve tried and loved.
Gluten-Free Version : Swap the all-purpose flour with a 1:1 gluten-free baking flour blend. I’ve used Bob’s Red Mill and King Arthur with great results. The crust will be slightly more delicate, so press it firmly and handle with care.
Dairy-Free Version : Use dairy-free cream cheese (Kite Hill or Violife work well) and vegan butter for the crust. The texture will be slightly less creamy, but the flavor is still fantastic. I tested this for a friend with dairy allergies and it passed the test.
Bourbon Pumpkin Version : Add 2 tablespoons of bourbon to the cheesecake filling along with the vanilla. The bourbon adds warmth and depth that pairs beautifully with the pumpkin spice. This is my personal favorite for adult gatherings.
Chocolate Swirl Version : Melt ½ cup of semi-sweet chocolate chips and drizzle it over the filling before baking. Use a knife to swirl it into the cheesecake batter. The chocolate and pumpkin combo is surprisingly good.
Gingersnap Crust : Replace the shortbread crust with crushed gingersnap cookies mixed with melted butter. Use 2 cups of cookie crumbs and 6 tablespoons of melted butter. Press and bake as directed. The spicy ginger flavor takes these bars to another level.
Mini Bar Version : Make these in a 12-cup muffin tin lined with paper liners. Press about 2 tablespoons of crust into each cup, fill with cheesecake batter, and bake for 18-22 minutes. Perfect for portion control or parties.
I’ve also made these with butternut squash puree instead of pumpkin when I ran out, and honestly, it worked beautifully. The flavor was slightly sweeter and the color was a bit paler, but no one noticed the difference.
Serving & Storage Suggestions
These bars are incredibly versatile when it comes to serving. Here are my favorite ways to enjoy them.
Serving Temperature : Serve cold or at room temperature. I prefer them straight from the fridge because the texture is firmer and the crust stays crisp. If you like a softer cheesecake, let them sit on the counter for 15-20 minutes before serving.
Presentation Ideas : Arrange the bars on a platter and top each one with a dollop of whipped cream, a sprinkle of cinnamon, and a candied pecan. For a holiday touch, dust with powdered sugar through a stencil. They also look beautiful on a tiered dessert stand alongside brown butter pumpkin coffee cake or cream cheese stuffed pumpkin chocolate chip muffins.
What to Serve With Them : A cup of hot coffee or spiced apple cider is perfect. For a dessert spread, pair them with brown butter apple cider snickerdoodle cookies or fluffy pumpkin cinnamon rolls with salted maple cream cheese frosting. If you’re serving these after a heavy meal, a light creamy dill cucumber and red onion salad on the side balances the richness.
Storage Instructions : Store the bars in an airtight container in the refrigerator for up to 5 days. Layer them with parchment paper between each layer to prevent sticking. If you’ve already added whipped cream, store them uncovered in the fridge so the cream doesn’t get watery.
Freezing Instructions : These bars freeze beautifully. Wrap the entire block (or individual bars) tightly in plastic wrap, then in foil. Freeze for up to 3 months. To thaw, transfer to the refrigerator overnight. Do not thaw at room temperature or the texture will be off.
How Leftovers Develop : The flavor actually improves over the first few days as the spices meld with the cream cheese. By day three, these bars are at their peak. I’ve never had them last past day four in my house, but they’re still good if they do.
Nutritional Information & Benefits
While these bars are definitely a treat, they do offer some nutritional benefits worth noting. Here’s the approximate breakdown per bar (based on 16 servings, without whipped cream topping).
| Nutrient | Amount Per Bar |
|---|---|
| Calories | 285 |
| Total Fat | 18g |
| Saturated Fat | 11g |
| Cholesterol | 85mg |
| Sodium | 210mg |
| Total Carbohydrates | 28g |
| Dietary Fiber | 1g |
| Sugars | 18g |
| Protein | 5g |
| Vitamin A | 80% DV |
| Calcium | 6% DV |
| Iron | 4% DV |
Health Highlights : Pumpkin is packed with Vitamin A, which supports eye health and immune function. It’s also rich in antioxidants like beta-carotene. The cream cheese provides calcium and protein, and the eggs add high-quality protein and choline for brain health. The shortbread crust uses butter, which contains butyrate, a fatty acid that supports gut health.
Dietary Considerations : This recipe contains gluten, dairy, and eggs. For gluten-free and dairy-free adaptations, see the variations section above. These bars are vegetarian-friendly and can be made nut-free by omitting the pecan garnish.
I’m not a nutritionist, and I firmly believe that dessert should be enjoyed without guilt. These bars are a seasonal indulgence, and I think that’s perfectly fine. Balance is key, and a slice of pumpkin cheesecake bar with your morning coffee on a crisp fall day is one of life’s simple pleasures.
Conclusion
These Perfect Make-Ahead Pumpkin Pie Cheesecake Bars have saved me more times than I can count. They’ve been my last-minute potluck hero, my Thanksgiving stress-reducer, and my go-to “I want to impress people without actually trying” dessert. The combination of buttery shortbread, creamy pumpkin cheesecake, and warm fall spices is honestly unbeatable.
What I love most about this recipe is how forgiving it is. You can make mistakes and it still turns out delicious. You can customize it a dozen different ways and it still works. You can make it three days ahead and forget about it until your guests arrive. That kind of reliability is rare in baking, and I don’t take it for granted.
I’d love to hear how these turn out for you. Did you try a variation? Add a twist? Serve them at a holiday dinner and watch them disappear? Drop a comment below and let me know. And if you share a photo on social media, tag me—I love seeing your creations. Happy baking, friends. You’ve got this.
Frequently Asked Questions
Can I use pumpkin pie filling instead of pumpkin puree?
No, please don’t. Pumpkin pie filling has added sugar and spices that will throw off the balance of this recipe. Stick with 100% pure pumpkin puree. Libby’s is my go-to brand, but any store brand works as long as it’s pure pumpkin.
Why did my cheesecake crack on top?
Cracks usually happen from over-mixing the batter or over-baking. Make sure you mix on low speed once the eggs are added, and take the bars out while the center still has a slight jiggle. Cooling them slowly also helps prevent cracks. If they do crack, just cover them with whipped cream—no one will ever know.
Can I make these bars in a different size pan?
Yes, but you’ll need to adjust the baking time. For an 8×8 pan, the bars will be thicker and need about 50-55 minutes of baking. For a 9-inch round springform pan, bake for 45-50 minutes. Keep an eye on them and use the jiggle test to determine doneness.
How far ahead can I make these bars?
You can make them up to 3 days in advance and store them in the refrigerator. They actually taste better on day two or three. You can also freeze them for up to 3 months. Just wrap tightly in plastic wrap and foil, then thaw overnight in the fridge before serving.
Can I use low-fat cream cheese or Neufchatel?
You can, but the texture will be slightly less creamy and the bars may not set as firmly. I recommend using full-fat cream cheese for the best results. If you do use low-fat, expect a softer, slightly less rich final product. It’s still good, just different.
Pin This Recipe!
Perfect Make-Ahead Pumpkin Pie Cheesecake Bars
These make-ahead pumpkin pie cheesecake bars feature a buttery shortbread crust, creamy pumpkin cheesecake filling, and warm fall spices. They’re perfect for holiday gatherings and can be prepared up to three days in advance.
- Prep Time: 30 minutes
- Cook Time: 45 minutes
- Total Time: 5 hours 15 minutes (includes chilling)
- Yield: 16 bars 1x
- Category: Dessert
- Cuisine: American
Ingredients
- 1 ½ cups all-purpose flour
- ½ cup powdered sugar
- ¾ cup unsalted butter, cold and cut into small cubes
- ¼ teaspoon salt
- 16 ounces cream cheese, softened to room temperature
- 1 cup granulated sugar
- 1 cup pumpkin puree (not pumpkin pie filling)
- 3 large eggs, room temperature
- 1 teaspoon vanilla extract
- 2 teaspoons pumpkin pie spice
- ½ teaspoon cinnamon
- ¼ teaspoon salt
- 1 cup heavy cream, cold (for optional topping)
- 2 tablespoons powdered sugar (for optional topping)
- ½ teaspoon vanilla extract (for optional topping)
- Crushed pecans or candied pepitas for garnish (optional)
Instructions
- Preheat your oven to 350°F (175°C). Line a 9×13-inch baking pan with parchment paper, leaving a 2-inch overhang on the long sides.
- Make the shortbread crust: In a food processor, pulse together the flour, powdered sugar, and salt. Add the cold butter cubes and pulse until the mixture looks like coarse meal with some pea-sized butter bits remaining. Do not over-process.
- Press the crust into the prepared pan firmly and evenly, about ¼-inch thick. Bake for 15-18 minutes until the edges are just starting to turn golden. Set aside to cool slightly. Leave the oven on.
- Beat the cream cheese: In a large bowl, beat the softened cream cheese with an electric mixer on medium speed until smooth and creamy, about 2 minutes. Scrape down the sides and bottom of the bowl.
- Add the sugar and beat until combined, about 1 minute. Scrape the bowl again.
- Add the pumpkin puree, pumpkin pie spice, extra cinnamon, and salt. Beat on low speed until just combined.
- Add the vanilla extract, then add the eggs one at a time, beating on low speed after each addition just until the yolk disappears. Do not over-mix.
- Pour the filling over the pre-baked crust and spread evenly. Tap the pan gently on the counter to release air bubbles.
- Bake at 350°F for 38-45 minutes. The edges should be set and slightly puffed, but the center should still jiggle slightly. If the top browns too quickly, tent loosely with foil for the last 10 minutes.
- Cool completely on a wire rack, about 1-2 hours. Then cover with plastic wrap and refrigerate for at least 4 hours, preferably overnight.
- Once fully chilled, use the parchment paper handles to lift the entire block out of the pan. Place on a cutting board and slice into 16 bars (4 rows by 4 rows) using a sharp knife. Wipe the knife clean between cuts.
- For the optional whipped cream: In a chilled bowl, beat the heavy cream, powdered sugar, and vanilla until soft peaks form. Pipe or dollop onto each bar and sprinkle with crushed pecans or pepitas.
Notes
These bars actually taste better on day two or three. They can be made up to 3 days in advance and stored in the refrigerator. For clean slices, run the knife under hot water between cuts. If the cheesecake cracks, cover with whipped cream. For a gluten-free version, use a 1:1 gluten-free flour blend. For a dairy-free version, use dairy-free cream cheese and vegan butter.
Nutrition
- Serving Size: 1 bar
- Calories: 285
- Sugar: 18
- Sodium: 210
- Fat: 18
- Saturated Fat: 11
- Carbohydrates: 28
- Fiber: 1
- Protein: 5
Keywords: pumpkin cheesecake bars, make-ahead dessert, Thanksgiving dessert, pumpkin bars, cheesecake bars, fall dessert, holiday dessert


