Best No-Bake Peanut Butter Oreo Icebox Cake Recipe for a Crowd
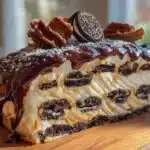
This no-bake peanut butter Oreo icebox cake is the ultimate crowd-pleasing dessert. Layers of soft Oreo cookies and a creamy peanut butter mousse create a make-ahead treat that’s perfect for parties and potlucks.
- Prep Time: 20 minutes
- Cook Time: 0 minutes
- Total Time: 8 hours 20 minutes (includes chilling)
- Yield: 12-16 servings
- Category: Dessert
- Cuisine: American
Ingredients
- Oreo Cookies (two 14.3-ounce packages)
- Cream Cheese (16 ounces, softened)
- Creamy Peanut Butter (1 cup)
- Powdered Sugar (1 ½ cups)
- Heavy Whipping Cream (2 cups)
- Vanilla Extract (1 teaspoon)
- Optional Garnishes: Extra crushed Oreos, a drizzle of melted peanut butter, chocolate shavings, or whipped cream rosettes
Instructions
- Soften the cream cheese: Take the cream cheese out of the fridge at least one hour before you start. If you forgot, you can microwave it in 10-second bursts, but be careful not to melt it. You want it soft, not hot.
- Whip the heavy cream: In a large bowl, pour 2 cups of cold heavy whipping cream. Add 1 teaspoon of vanilla extract. Beat on medium-high speed until stiff peaks form. This takes about 3-4 minutes with a hand mixer. You’ll know it’s ready when you lift the beaters and the cream stands up straight. Don’t over-whip, or you’ll end up with butter. Set this bowl aside in the fridge.
- Make the peanut butter mousse base: In another large bowl, beat the softened cream cheese with an electric mixer until smooth and creamy. Add 1 cup of creamy peanut butter and beat until combined. Gradually add 1 ½ cups of powdered sugar, beating on low speed at first to avoid a sugar cloud. Scrape down the sides of the bowl with a spatula. The mixture will be thick and sticky at this point.
- Fold in the whipped cream: Take the whipped cream out of the fridge. Add about one-third of it to the cream cheese mixture. Fold gently with a rubber spatula—don’t stir. You want to incorporate the cream without deflating it. Add the remaining whipped cream in two more additions, folding until no white streaks remain. The mousse should be light, airy, and a pale brown color. Taste it. Yes, it’s good. Stop eating it.
- Layer the cake: Spread a thin layer of mousse (about ½ cup) on the bottom of your 9×13 dish. This helps the first layer of cookies stick. Arrange a single layer of Oreos on top of the mousse. You’ll fit about 16 cookies in a single layer—four rows of four. Don’t overlap them. Spread one-third of the remaining mousse over the cookies. Use an offset spatula or the back of a spoon to spread it evenly. Repeat with another layer of Oreos, another third of mousse, and a final layer of Oreos. Spread th…
- Chill overnight: Cover the dish tightly with plastic wrap. Refrigerate for at least 8 hours, but 12 to 24 hours is better. This is non-negotiable. The cookies need time to soften and absorb moisture from the mousse. If you try to serve it early, the cookies will be crunchy and the cake won’t slice cleanly. Patience, my friend.
- Garnish and serve: Before serving, you can add toppings. Crush a few Oreos and sprinkle them on top. Drizzle melted peanut butter in a zigzag pattern. Pipe whipped cream rosettes if you’re feeling fancy. Use a sharp knife to cut slices, wiping the blade clean between cuts for neat edges.
Notes
Don’t rush the softening process. Cold cream cheese is the enemy of smooth mousse. Whip the cream to stiff peaks. Fold, don’t stir. Use a sharp knife for clean slices. Let it rest after slicing. This cake actually tastes better on day two. The flavors meld together, and the texture becomes perfectly uniform.
Nutrition
- Serving Size: 1 slice (assuming 16
- Calories: 420
- Sugar: 24
- Sodium: 320
- Fat: 28
- Saturated Fat: 12
- Carbohydrates: 38
- Fiber: 2
- Protein: 9
Keywords: no-bake dessert, icebox cake, peanut butter, Oreo, crowd-pleaser, make-ahead dessert, summer dessert, potluck dessert